Sunday, February 7, 2016

Crab Rangoon Pizza Tutorial

The Story:

Crab rangoon has become a staple of the American 'Chinese' cuisine experience, at least in my part of the country. Originally just a fried wonton filled with cream cheese, it was named for the shape it was folded into before frying. Eventually they evolved to contain actual crab, surimi, or shrimp.
Fong's Pizza in Des Moines specializes in putting favorite 'Chinese' dishes onto pizzas. By in large their most popular is the crab rangoon pizza. My love of actual crab rangoon led me to seek it out and I loved it. I wanted to make it at home and it's quite good!

The Ingredients:

Crust

The ingredients called for in this recipe will make two pizzas. I prefer to use a thin and crispy crust. I have used a cookie sheet sized refrigerated pizza to make a single pizza from the same ingredients that was somewhat decent.

Cream Cheese

I prefer to use onion & chive whipped cream cheese. Today I'm using 1/3 fat regular so it's a little easier on our familial digestive tracts. Whipped cream cheese is easier to spread, but it's best if you leave this out on the counter for a couple of hours before using to soften.

Crab (Surimi)

Flaked-style imitation crab meat is the traditional, but you could also slice up the leg style. We once grabbed lobster delight instead of crab delight and it was exceptionally rich.

Cheese

You really want to get a good cheese for this. I prefer to find a blend that contains asiago. Sargento's 6 cheese Italian blend is what we usually use. You only need a 2 cup package.

Wontons

We get these fried wonton strips from the salad toppings section. If you can't find these you can sometimes find wonton chips or you could fry your own.

Sweet Chili Sauce

When our local grocery sells this pizza as take and bake, they sometimes try to include a cup of sweet and sour sauce that falls flat. Sweet chili sauce has what you need to cut through the other rich toppings.

The Procedure:

First you need to check your crust package or recipe for instructions on prepping the crust. Here's what mine says:

I fired up the oven and placed the crusts on top of parchment lined aluminum pizza pans. The parchment isn't generally required, but our pans are in rough shape after years of usage.  Next I poured a small amount of olive oil on and spread it with a small piece of paper towel.


Now you can spread on your cream cheese. I always split one tub evenly on both crusts.

I use an off-set spatula designed for frosting cakes, but it doesn't really matter what you use as long as you get it all over. Cream cheese firms up as it cooks so where you put it is where it will stay.


Now you can open up your package of imitation crab meat and it will probably look like this:

Break it up and pull it apart into more bite sized pieces:

Sprinkle it over your cream cheese base. Spread them out very well because like the cream cheese, they aren't going anywhere.

At this point you could add some optional chopped green onion, but I find that you get enough onion flavor from the cream cheese.

Next you add the cheese. Start by sprinkling around the outside edge and then filling in the middle so you don't end up with too much cold cheese in the center.

After the cheese, I usually sprinkle on the wonton strips. If your crust recipe takes longer than 10 minutes to cook, you may want to add them during baking so they don't burn.

Now you only need to bake them as instructed by your crust instructions. I usually have to bake them one at a time in my oven.

Once they are baked to your liking, you should drizzle on the sweet chili sauce while they are still hot.


Allow a few minutes to cool slightly before slicing and enjoy!


The Recipe:


Crab Rangoon Pizza Makes 2 pizzas
Ingredients: 1 pkg. Mama Mary's Thin & Crispy pizza crusts (or 2 crusts of your choice) olive oil 1 8 oz tub of chive & onion cream cheese 1 8 oz pkg imitation crab meat, flake style 1 bunch of green onions, chopped (optional) 8 oz of shredded cheese, preferably with Asiago 2 to 4 oz of fried wonton strips Thai sweet chili sauce, for drizzling
Preheat oven to 450 (or follow instructions for you pizza crust). For each pizza, lightly brush crust with olive oil then spread half of the cream cheese. Separate the pieces of crab meat and spread half over each pizza then sprinkle with the chopped green onions. Spread the cheese evenly over the top and then add wonton strips to your liking. Reduce oven temp to 425 and bake pizza for 7 to 10 minutes (see your crust instructions). Remove from oven and drizzle with the sweet chili sauce. Let sit for 2-3 min before cutting.

Thursday, May 7, 2015

So I had chronic appendicitis... (the innards saga)

I guess a little history of my GI tract is in order.
When I headed off to college, about 14 years ago now, I developed IBS-D. IBS is often triggered for the first time by a stressful event. I spent a long time learning to manage it through mostly diet.  About 5 and a half years ago, right before my wedding, I got a really bad pain right below my belly button. I went to urgent care twice before I was sent in for a CT scan. I was told the CT showed enlarged lymph nodes and it was a virus that would resolve. It resolved like clockwork. Later I found out that is called mesenteric adenitis.
About a year later, I developed fairly typical symptoms of gallbladder issues. I had an ultrasound and HIDA scan that didn't show any dysfunction so the GI doctor put me on Nortriptyline to calm the nerves in the gut. Over a year, I was increased to the maximum dose they would give for that type of treatment. My primary care physician finally had me rescanned and my gallbladder had negligible function. I had a cholecystectomy.

After that, I had a good two years. I could eat reasonable amounts of fats in my food without being in pain for a day and my IBS was well controlled with daily probiotic capsules.
Then December of last year, I started to feel this occasional pressure in my right side. It was hard to pinpoint, but I always kind of generally referred to the love handle area when telling people about it. I am used to feeling weird sensations in my gut.  As the days went by, it became pretty constant. I thought maybe it was postural and tried to sit with my core engaged. By mid January, it became painful and started slowly shifting depending on what position I was in. Standing: love handles, sitting: ribcage/shoulder where gallbladder used to hurt, laying on my back: like kidney pain.  My doctor didn't have any appointments, so I went to urgent care.
The urgent care doctor checked my urine, did a CBC, and did all the tests to check for acute appendicitis (things like moving your leg around or pressing in specific spots and seeing if it hurt more). With my urine and CBC clear, she had them schedule a CT scan. When I was called with the results, they said it looked similar to my scan from 5 years ago with a large appendix and slightly enlarged lymph nodes. What? Nobody told me 5 years ago my appendix looked enlarged!  She didn't seem to think that meant anything since it hadn't changed much in 5 years so I ended up having a pelvic (including transvaginal) ultrasound which was deemed unremarkable. I was told to follow up with my primary care provider.
I sent a direct message to my primary care provider and was granted one of their secretly open appointment slots. She looked at everything that had been done, decided my pain was more right upper quadrant than right lower quadrant, and referred me back to the GI doctor I had seen with my gallbladder issues.
The GI doctor I have seen most is actually a physician's assistant. PA's are pretty great, but they are better for treating cases that fall within the normal range of a defined illness. Literally her first suggestion was to go back on Nortriptyline then she took a good look at the medicines I was on and said I was pretty high risk for peptic ulcers. She had a lot of other suggestions too, including chronic appendicitis.  She thought the pain could be from a duodenal ulcer, so I was scheduled for an upper GI scope. I actually had one of these back when I started having gallbladder issues too. I guess when something doesn't seem typical, they like to just go in and have a look-see.  The endoscopy, performed by the physician she is the assistant to, was also unremarkable.
When I went back for a follow-up with her 3 weeks later, she started throwing ideas around again. I had been doing research and I wondered about SIBO (small intestinal bacterial overgrowth). She didn't think the pain was typical of SIBO but she was totally cool with me taking the non-systemic antibiotics for it as well as trying a low FODMAPs diet.  At first I felt great, but then the pain came back like an attack only now it wasn't radiating as much. Now you could really feel it if you pressed in that area where it's supposed to hurt when you have appendicitis. Now I was getting really nauseous a lot of the time. On top of that my bowels were irritated from the antibiotics, like they do. After some more messaging, I was referred to a surgeon.
The surgeon's nurse was really diligent in finding out why they suspected my appendix and calling the radiology place for my old scans. The surgeon was great too. He looked at my history going back to before the gallbladder was out. He also told me the most important facts: It's hard to get a good image of the appendix. It's normally like pulling teeth to get the radiologist to mention it when you're looking for it.  Mine was really big. He also said he didn't used to believe that chronic appendicitis existed, but he'd seen it.  He couldn't guarantee fixing my pain, but the benefits outweighed the risk. My appointment was on a Friday morning and he had his nurse find an OR for Monday morning. Longest weekend ever.
Not much I can say about the surgery. It was pretty normal outpatient, laproscopic stuff. Home in 3 hours feeling the best I ever have after that kind of thing. I was told I could resume normal activity as I felt like.  I was back at work in a week.
My follow up with the surgeon was short. Yes, under the microscope it was appendicitis. A normal appendix is about 6mm wide, mine was 1cm. Your entire pinkie finger would be a good visual of the general size of it.  Despite seeing chronic appendicitis again, the surgeon still declared it to be weird.

Sunday, April 15, 2012

Lard.

It all started when I saw a class advertised for pie making.  I thought the cost of the class was sort of pricey, until I saw that they intended to show you how to render your own lard for the crusts..... then I was intrigued.  I looked up rendering lard and how shelf-stable lard in the grocery store is actually kind of horrible because of how they alter it.  Then I got on our food co-op website and discovered that I could actually get heritage breed unrendered lard.  I added it to my cart.
And THEN I discovered that I could use my crock pot to make it really easy! Here's the howto.

This is what 4.88 lbs of unrendered pig fat looks like!
This lard was pre-ground and came from pastured heritage breed pigs!
This is my straining rig.  From the top: tomato colander, cheesecloth, wire strainer, sturdy mixing bowl.
Here is the frozen lard in my crock pot.  I have an actual crock pot which gives a stabler heat than some brands of generic slow cooker.
Here's what it looked like after I'd taken off about half of the fat.  I kept the lid off of the crock pot for this entire time because I added 1/4 cup of water at the beginning so the lard wouldn't burn but I wanted the water to evaporate out.
The lard that came off the first straining.
As you can see this method works really well for giving you pure fat.  At this point the liquid had practically no odor or flavor.
All of the fat is strained at this point.  What you have here is basically cooked ground pork with a very high fat content. I put this back into the crock and cooked on high.
The "cracklings" that came of cooking the pork further.  I expected these to be more crunchy, but they were totally soaked with fat.  When they were drained, they were kind of like soft real bacon bits.  I intend to use them as such as the flavor is similar.
So much lard!
Bottom: some of the white lard that was strained off earlier. Top: still liquid fat that was drained off of the "cracklings". This brown lard would be horrible for pastries but can be used to cook savory things in, similar to bacon grease.
 Here's where the lard came from!

Saturday, August 13, 2011

Runza Casserole

Ingredients:
1-2 lbs of ground beef, turkey, or meat substitute
1 bag of Dole Classic Cole slaw or about a head of shredded cabbage
1 small onion chopped or about 4 Tbsp of dried onion
2 cans of refrigerated crescent rolls
salt and pepper
optional: mozzarella, Swiss, or american cheese (1/2 to 2 cups or ~6 slices), sliced mushrooms

Preheat oven to 350 while you brown the meat.
Unroll 1 can of crescent roll dough and lay it flat in the bottom of a greased 9x13" casserole.  Bake for 7 minutes.
Meanwhile, drain the meat and add the cole slaw, onion, salt, and pepper.  A typical runza is heavy on the pepper.  Place a lid on your skillet and allow the cabbage to steam while the bottom layer of dough finishes baking.
Dump the cabbage and meat mixture onto the bottom layer of dough and spread flat.  Top with your desired cheese and mushrooms, if desired.
Unroll 2nd can of dough and lay flat over the top.  Bake for 30-40 minutes.  Place foil over the top near the end of cooking or after removing from oven for a softer crust.

Friday, November 12, 2010

How to (roughly) joint a turkey...

Our preferred regional grocer, Hy-Vee, had a deal going on last week where you bought a smoked ham and you got a free 8-10 lb turkey.  Since we actually went grocery shopping that day, we went ahead and got in on it.  We got about $10 worth of free turkey.  We don't really have the space in our house to invite over more than 3 or 4 visitors or prepare a large gathering meal, I decided to thaw it and dismantle it.  With poultry, this is sometimes referred to as jointing.

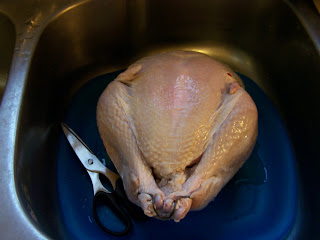
Here's a prep shot.  I know from messing with whole chickens that once they've been frozen and injected with saline that they will continue to leak and leak fluids no matter how many paper towels you have to pat them dry, so I decided to use a pair of plastic platters as cutting boards.  I also have a bag for putting the random extra bits in for stock.  You should always save poultry skin and bones for stock because its so incredibly easy to make stock at home!

And here's the turkey exactly how it came from the store:


Here's the turkey just unwrapped.  Despite days of thawing, there was ice in the folds and the entire center of the bird.  This is a trouble I regularly have when trying to thaw any kind of meat in my refrigerator.  I also had trouble removing the wire holder from around the legs and vent (the turkey's rear) there.  The popup thermometer came out pretty easily for having a barbed end.


The giblet package was in the neck skin area and the neck was shoved up the vent.  Here's a shot after I took that out and used shears to remove the skin.


The next step was to cut down the middle of the breast bone and separate the two breast portions from each other.  This was a relatively difficult step in a turkey compared to a chicken, but I found that I was able to get pretty good leverage with the poultry shears.  Next, you fold open the turkey "like a book."


Pretty gross, I know.  I usually take a moment to clean up anything the processing people might have left behind up in here.  Next, flip over the turkey and press down on the backbone (snap!) to free it up from the surrounding meat.


Then flip it back over and cut down from neck to vent on both sides of the backbone to remove it.  I found that I had to use the shears for leverage again.  Seems my boning and carving knives could use a sharpening.  They didn't even want to cut through the skin.  Now you have 2 turkey halves.


 I decided to cut the halves into quarters: breast, thigh, leg, and wing.  You could just halve it or you could just leave the wing on the breast.  Turkey wings are less meaty and way more full of skin than chicken wings.  You could take most of the wing off and put it in the stock bag.   I put a few red lines on this pic to show roughly where the parts separate at.


Cutting the turkey into quarters goes pretty easily if you start by separating the thigh from the breast first. If you lift up the drumstick, you can easily see the separation between the two to cut through.  Next I separated the wing by lifting it up and finding the joint.  Separating the drumstick from the thigh can be tricky because you have a huge bone at the joint, which might be a good excuse to leave them attached.


I put them into 3 freezer bags: wings & legs, thighs, and breasts.  I put the first two bags into the freezer but will likely put the breasts into the crock pot today or tomorrow.  I want to cook them and then shred the meat to use in meals since one breast could probably feed both of us.

Normally, I would prefer not to thaw and refreeze something this much, but it was done using the safest thaw method and more processed turkey can actually be frozen and thawed multiple times before it gets to your house (and still costs you more because of labor!)  And also, I was right about that whole leaking fluids thing...

Final step: disinfect.  Seriously... use bleach.  Turkeys are filthy.

Sunday, August 15, 2010

Mary Margaret McBride

Other than asking my grandmother, I suspect nobody will recognize the name in the title of this post.  This name, however, was located on the spine of a cookbook that my mother decided I should have.


It is: Mary Margaret McBride - Encyclopedia of Cooking - Deluxe Illustrated Edition (Regular Hard Cover Binding).  The book was published in 1959 with over 1500 pages.  It was apparently released in several forms, including a multi-book, truly encyclopedic version.  I suspect the editor, Anne London, did most of the work on this because Mary Margaret McBride was a very well known radio show host.  Anne London also did a large cookbook of Jewish American recipes.

Though my copy is missing a cover and all of the copyright pages (it starts at the useless table of contents) as well as horribly stained, it contains an amazingly valuable amount of recipes and food knowledge.  It does, however, contain the suspected weird 1950s food items that could make your stomach turn.  For example, aspic, mousses made from meat, loafs and molds of various mixed food items, and more tongue recipes than you knew existed.
As I was pondering the possibility of actually trying some of these oddities, I considered the reasons why people made these things in the late 50s.  Radio was still big but TV was booming.  Air travel was just overtaking boats for oversea voyages.  The space race was fully on.  People had refrigeration, but not so much in terms of microwaves (they existed but were still being perfected).  The economy was more local.
Several sections of the book are dedicated to what to do with cake mix, biscuit mix, and hot roll mix.  Food was switching from classic methods of preparation and preservation (like aspic) to the new modern conveniences.

Speaking of hot roll mix, I had no idea that it existed before now.  I thought, perhaps, that it was a product that was no longer around.  Apparently it is still manufactured, primarily by Pillsbury.
  PILLS HOT ROLL MIX
Basically, it is a mix containing the all of the dry ingredients you need for a basic white yeast dough, with a separate instant yeast package included in the box.  According to their website, it can actually be bought at all of the Hy-Vee stores in the area despite my never ever noticing it before.

I have no idea if the copyright on this cookbook is still valid (copyright law is zany), so I won't be posting any recipes directly, but I will try to post my adventures as a 1959 housewife as soon as I can.  Tim wants to make a bunch of the ickier looking things :-P

Oh, also, there's totally a recipe for avocado ice cream in here.  Not a very new concept then, eh?